The clearest video of a Matthew Brand hologram on the web.
It would seem that my blog is getting a bit more traffic now due to my previous post about my adventures with specular holography. I decided that it would be prudent to offer up my holograms in a crowdfunded fashion. I just launched a relatively modest campaign for $5000, which would fund a low-end CNC machine, aluminum stock, and a few months rent on a little tiny office/studio space where I can setup the machine and 'get my hologram on'.
'Holocraft', a program that generates toolpaths for a hologram's fabrication.
Originally, when I set out to do this project, my plan was to refine the cardstock holograms to a viable product that could eventually fund a CNC machine for creating high quality metal plate holograms, but the cardstock holograms are just not quite "there". The cost/benefit for getting them to look pristine is just not a viable route. But, I am sure someone would like to have them just as a novelty item, or maybe even to frame and hang on their wall. I am just not comfortable directly marketing them as a finished product, because I personally wouldn't want one myself. I want a heavy duty super duper shiny metal hologram!
I ask that if you think this project is cool, and want to see more stuff happen, please spread the word about it and tell your friends. Facebook, Tweet, and otherwise social-network the snot out of this blog and/or my Indiegogo campaign. I have this strong feeling that this medium is the tip of the iceberg, and that a lot of energy will change form as a result of it. It just needs to get out there in front of people and on their mind.
I've already figure out virtually everything there is to figure out about how to run Holocraft output on the CNC machine, what cutting tools to experiment with, what grade aluminum I should use, and have already sourced every single thing that I will need to buy to make it all happen.
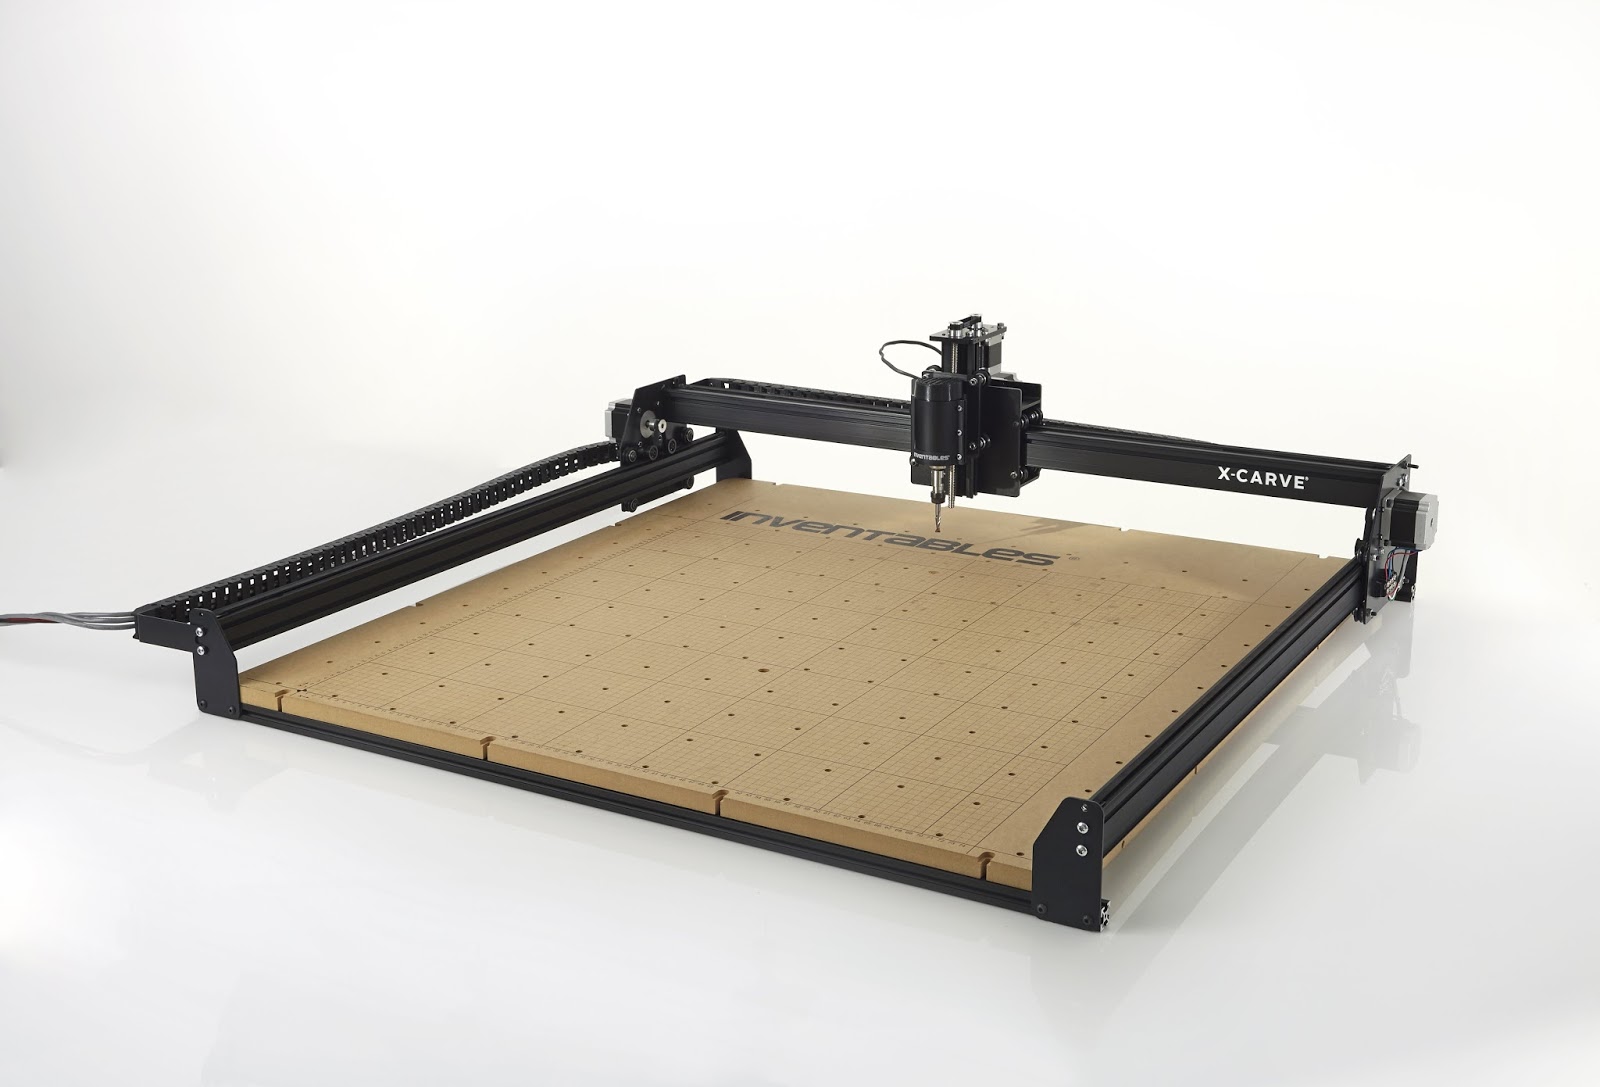
After much consideration, weighing the pros and cons of every available desktop CNC google would show me, I settled on an X-Carve by Inventables, which is controlled by an Arduino that's running the open source g-code interpreter GRBL. Worst-case it hold a tolerance of 5-thousandths of an inch, which is pretty sloppy by professional fabrication standards, but is just good enough for my holographic endeavors. It also boasts a 31x31 inch work space, which is a far cry better than the size that most other machines offer. Some of them offer less than a foot of working space, but most of them have working area dimensions that are less than two feet. I want to be able to make holograms that are relatively large-format. Once you get too big, though, the fact that the light source isn't infinitely far away starts to interfere and distort the hologram, because each area of the hologram is then receiving incident light at more widely varying angles. This can be compensated for, but it's going to require special attention and more math.
The X-Carve CNC mill I aim to acquire for holographic purposes.
After a bit of research I've opted to go with 1/16th inch plates of 1100 aluminum alloy. 1100 aluminum is 99% pure, which is much more pure than all of the alloys, with the exception of 1050 and 1060. Pure aluminum is much softer to work with, and machine, with a Brinell hardness of 28 (copper is at 35, lead is 5, steel is 150). This means that the tiny cutters used to machine the hologram reflector grooves will not wear down as quickly, which is a good thing. 1100's softness and purity lend themselves well to optical applications, because it can be polished to a mirror shine without impurities mucking it up.
Another issue that cropped up was the fact that CAM software typically isn't designed to handle the sort of input that Holocraft generates. Typically, when importing a path of some kind, these programs like to assume it's a closed shape, that you either want to use as a hole, or an island/extrusion of some kind. In this case it's neither, I just want the machine to cut an arbitrary groove as output by Holocraft.
Of all the different high-end CAM software which I was able to locate trial-versions of to investigate, none of them were going to be able to import Holocraft data and use it properly. I was about to give up when I came across MakerCam, which is actually just a Flash applet that runs in a browser (http://www.makercam.com). By the grace of awesomeness it happens to do exactly what I need it to do. It will import an SVG that Holocraft outputs, and allows me a 'follow path' operation, and let me output the g-code as such. However, it struggles a *little* with the high number of paths that Holocraft outputs, which can be upwards of tens of thousands of individual little curved reflecting groove optics, which tempts me to just implement direct g-code generation capabilities into Holocraft. It would not be the first time that I wrote a program which generates g-code.
'Chamfer King' - One of the several CNC machining utilities that I wrote for my dad's CNC shop back in the day.
What I really need to do now is brush up on my 3D modeling skills, and start producing my own content to 'holographize' that actually represents my own creative self-expression, of which I have plenty to draw upon. I've only been testing out Holocraft using models on the various online repositories of 3D-printer models. There are some really decent paid models which would make some good holograms, but I'm more interested in making good holograms that depict what I want them to depict, not just what works.
Bitphoria is not dead. I did, however, take a break over the summer to take care of some Real-Life situations. Recently I have mostly been cleaning up code, doing a second-pass over the code to add in error-checking wherever I didn't when I initially wrote the code. I also managed to work out the bugs and kinks in the networking that were highly problematic. There were a handful of bugs that were total project-killers at the time that I decided to take a break. Once I came back to it, they ended up being simple one-line fixes that I had originally feared would require revamping entire swaths of code. Exciting times. Bitphoria is alive and well, and I will be posting more updates about further progress sooner than later.
In the meantime, I have recently found myself distracted with another project. My wife and I run a business out of our home, selling crafts we create ourselves using various computer controlled printers and cutting machines. There is a sort of pressure to come up with new products to make and sell to keep ourselves relevant in the online marketplace. This side project seems to me to be quite a lucrative endeavor that I am excited to be able to work on.
Now, in the late 90's, when I was barely a teenager, I discovered a website by a man named William Beaty. This page was about his discovery and adventures with something that is now referred to as 'scratch' or 'abrasion' holography. At the time I thought it was interesting, but only cared about learning about conventional holography, using lasers, and producing interference patterns in photographic media. I hadn't really thought much about scratch holograms since then, until one night a few weeks ago.
William Beaty's Website as of 1999 (via Archive.org) I specifically remember this ASCII art from my initial discovery of his webpage.
I was goofing around in the dark in the bathroom of our home with my four year old daughter, with a flashlight. Incidentally I was telling her about the 'ghosts' I wanted to make in Bitphoria, that chase the player around, just like the ones in Pacman. She asked what they looked like, and being quick on my feet I smudged one into the mirror above the sink. We discovered and observed a few neat optical properties of this greasy smudge I made. Shining the flashlight on it casted a shadow on the ceiling of the smudge, because it wasn't reflecting the light to the ceiling the way the rest of the mirror was. I also noticed the holographic depth effect being produced by the fact that both my eyes were receiving a different specular configuration of light reflecting from the smudge.. This reminded me of the scratch hologram website, particularly where he explains that he witnessed a holographic effect in a car's windshield that exhibited the same properties and behavior.
Beaty's 20-year old photograph of the hand smudges that inspired his experiments.
The site I originally stumbled across as a teenager is still up today, and I managed to track it down that night. I don't know exactly when or why I became fixated. Maybe I had unconsciously wanted to make these holograms all my life, at some point, and it seemed that point in time had come.
The gist of scratch holography is that by using a drafting compass, or some other means for producing circular arcs, one can embed scratches, or grooves, into a reflective surface, which will then catch the light producing specular glints that shift depending on the angle of the viewer/light/surface. The end result is that one can produce points of light that behave as if they are suspended behind or infront of the medium or material. The circular arc scratches that produce these points of light can be configured to yield various shapes and designs that exhibit themselves with a holographic effect.
A collection of Beaty's hand-drawn holograms, and a diagram depicting producing a 'V' hologram on an appropriate surface medium, showing the resulting configuration of arc-scratches that produce a V-shaped hologram out of reflected light.
My first thought was to automate the process, to produce the best possible scratch holograms. It quickly became apparent, in my googleage that I was not the only person to have this idea. I did a lot of searching, and it would seem that there is only one program that became somewhat popular online, called 3DSilhouette. It is a VisualBasic application, and is simply not available online anymore. From what I gather you can email the author for a copy, and he will provide instructions that it must be installed to a specific directory path on your computer in order to work.
3DSilhouette creates a variety of output. It can output the actual scratch arc positions, or it can output a pattern of vertical lines that allow one to use a compass by anchoring the compass to one end of the line, and then reaching the scratching-end of the compass to the other end of the line to get the proper arc-radius, and then go ahead and make the arc itself. This all seems great, if you want to make scratch holograms by hand.
Raul's scratch-hologram generator program, which loads .3DS model files (as output by 3D Studio Max) and calculates circular arcs that are to be made to reproduce the model in a holographic form via scratch holography.
The only other program I was able to find anything about was in the form of a video, and the program was a part of a project by a team of MIT students who were creating both the software and the machine to produce the holograms in a completely automated fashion. This Youtube video is all that seems to exist of the man's work, as he has posted no updates about the program, machine, or it's output.
This program appeared to be very promising, and possibly of higher quality than Raul's 3DSilhouette program. But there is not one other shred of evidence that this program ever existed online for the public, or that it was ever something that actually did anything, and could have just as easily sat and on someone's hard-drive since the making of this video. Judging by the video, however, it does appear to produce the best possible scratch hologram by way of orchestrating a plethora of circular arcs required to reproduce the supplied 3D model data, to some degree.
After some reading, and Youtubing, I learned that utilizing circular arcs, per-se, as an optical surface are not the ideal geometry if you wanted a rigid holographic effect that didn't show distortion and collapse the 3D scene being displayed. This distortion can be seen on Raul's videos of the scratch holograms his software output patterns for. It's very obvious that the 3D effect is rather distorted, and over-exaggerated, in that the perspective of the 3D scene rotates too much when the viewer moves very little horizontally. This is not desirable.
Several people have explored scratch holography, in search of optimization of these mechanically produced holograms. One person, named Matthew Brand, had the means and the know-how to go about figuring exactly what was needed to produce the best-possible holographic effect using the scratch hologram medium. He managed to discern the exact math that would allow the calculation of an optical surface topology that would yield distortion-free holograms via the specular reflection of light.
Brand began this project in 2008, and demonstrated that an optical surface could be machined, which foliates (or approximates) the necessary mathematically accurate surface calculated that would produce the desired holographic effect for a given set of 3D points. His extension of scratch holography is referred to as 'Specular Holography', in that it hinges on calculating how to manipulate a surface and the resulting specular reflectivity so that a much higher fidelity holographic effect is produced. Brand made scratch/abrasion holography into child's-play, and refined the art into something that nobody else has been able, or willing, to explore since.
He went on to produce over one-hundred works, most of which were a part of an art installation at the 'MoMath' exhibit (Museum of Mathematics) in New York. Currently, the Specular Holography installation is being sold off, for $1,200 per hologram, via http://momath.org/home/light-grooves/
That is quite a pretty penny that these holograms are fetching. In the meantime, Brand has moved on to bigger and better things (ie: Lumography). He wrote a whitepaper on the workings of Specular Holography, which was published in 2010. Since then, it seems that nobody has taken interest in his work, to expand on it, or explore it further. Brand himself has not even followed through with a second paper that he mentions being necessary in his existing paper. It would seem that Specular Holography, in all of its glorious precision and beauty, has yet to catch on as a medium.
To my mind, it's something that has the potential to 'catch-on' and go mainstream.
At any rate, it became clear that if I wanted to create an automated means for producing marketable holograms, I would have to write my own 'hologram generator' program that incorporates Brand's mathematical derivations. I spent a few days decrypting the academic conventions Brand conveys his ideas through, and managed to glean from his paper what was required of a surface to depict rigid beautiful holographic surfaces.
By happenstance, one of our cutting machines had recently 'died' - a Craftwell eCraft Die Cutting Machine, which we used to create half of the products that we sell online to support ourselves. This machine died whilst being utilized to produce prototype halloween decorations in early September of this year. Now, when I say 'died', I mean that the bearings which are inside the blade-holding assembly, which performs the actual cutting of the paper/cardstock, 'became' jammed (long story).
The machine still functions as designed, moving the blade head where it's supposed to go on the cutting medium, except for the fact that we can no longer cut out material via the requisite swiveling blade mechanism that it relies on to be able to cut at all. That is to say that the machine still attempts to cut, it just cannot due to the fact that the blade is essentially stuck in one orientation and cannot follow the direction of the cut anymore.. But the software and machine, otherwise, are still operational.
In the face of my wife telling me to throw the machine out for weeks, or months even, I resisted, knowing all the while that someday I would figure out *something* that I could do with the poor feat of engineering that had lost its way.
The night with my daughter, and being reminded of Beaty's website as a kid, I had finally found an application that I could re-purpose our otherwise 'dead' machine for, breathing some life back into it's utility and value, thus turning it from a liability, as something just taking up space and collecting dust, into a valuable asset. All that needed to be done was bridge the gap between the idea of making holograms, and producing an actual marketable product, and the resulting income from profits would further fund life, ventures, Bitphoria, etcetera.
The Craftwell eCraft Die Cutting Machine, since discontinued after we acquired ours during the holiday season of 2012. It's a machine that required some 'finesse', thus frustrating many buyers and leading to its demise.
My work was cut out for me. I had to figure out how to write a program that generates the necessary arcs to produce a viable hologram, and output an SVG file that could be imported into the eCraft software. Then, figure out how to fashion a means for the machine itself to actually produce the proper effect on an unknown material that would yield a hologram as the end result. I began exploring my options for a material or medium that I could scribe light-catching grooves into.
Initial thoughts were about foil, adhered to cardstock, and using the built-in pen tool of the eCraft to produce relatively cylindrical grooves that would catch the light reliably when embedded in foil/cardstock. After some preliminary tests with foil/cardstock and a ballpoint pen, it was clear that the arcs would not be able to create sharp enough 'glints' of light, and were too hazy and blurry to be usable.
The next idea was to use something like Mylar adhered to cardstock. Surely Mylar was reflective enough, and flexible/yielding enough to allow these ballpoint-pen embedded grooves to form and produce the necessary specular glints that were required, in order for a hologram to work. After trial-and-error, with Elmer's glue, cardstock, Mylar, it became clear that the moisture in the glue was warping the cardstock too much, and was simply unusable. My next idea was to try to use petroleum jelly (Vaseline, Aquaphor) instead, because I knew that it would not 'absorb' into the cardstock and cause it to expand and warp. This *did* produce perfectly flat sheets of cardstock with Mylar adhered to it, but was a tedious process involving a big greasy mess, and a rubber roller to roll the greasy blob as flat as possible between the Mylar and regular cardstock.
It became clear that simply using reflective cardstock was the answer. It's effectively cardstock with Mylar adhered to it in a factory, and so it can be expected to be the best possible material for a limited fabrication means. So I picked some up and it seems to be working out as well as one could expect. It took some trial-and-error to determine what sort of tool I could engineer (ie: a finishing-nail I filed down using my late father's tools), that was capable of embedding grooves into the reflective cardstock surface which catches the light at a shallow-enough angle to be a viable means of creating a holographic product which we can market to the average consumer.
The only requirement for viewing these holograms is that they are positioned below a light source that's not too far infront of the hologram. Brand's work on Specular Holography allows one to compute an optical surface capable of depicting a given set of 3D points for a given illumination point altitude, relative to the hologram itself. One can calculate the best possible configuration/foliation of the optical surface of the hologram for various illumination altitudes, where the light source is progressively more infront and less above the hologram. If you take a hologram calculated to work with an illumination point positioned almost directly above it, the 3D depth effect is magnified as one moves the light source further and further infront of the hologram. The grooves catch the light as steeper and steeper angles, resulting in the glints moving across the curve of the grooves more and more as one's perspective changes. This effectively turns the hologram into a smear of light because the specular 'glints' stretch out as every position of the groove approaches an angle that can reflect light to the viewer.
It is my belief that a hologram produced to operate ideally at a 22.5 degree illumination angle (where the light source is half-way between a 45-degree angle and being positioned directly above the hologram) one could reliably decorate a wider variety of rooms with an overhead light source and have the holographic effect operate as much as can be expected. This is what I believe to be a marketable hologram, because it will work in the widest variety of situations that the holograms will probably wind up.
Once I figured out a viable material for creating the holograms on, the next step was actually writing a program that could properly calculate tool paths for the hologram grooves, output them as an SVG file which could then be loaded into the eCraft software, and then actually produce the hologram on the reflective cardstock. Somehow I opted for the name 'Holocraft', combining 'hologram' and 'eCraft'.
I spent some time surfing 3D model websites, and reading up on various model formats. I opted to use the STL, or 'Stereolithography', model file format, which happens to be one of the primary formats used to store and convey 3D printer models. Many of the websites that serve as platforms for communities of 3D printer enthusiasts are chocked full of STL models one can download and print on their own 3D printer. Simultaneously, the STL file format itself is extremely simple to load and parse.
After a few days I had something usable. Initially I was working with circular arcs, to get everything up and running, and produce something interesting. I had to figure out the best size and width/height ratio for the arcs, and also learned how to use the arc path command in SVG so that I wouldn't have to output individual points for the arcs, but could instead utilize the built-in capabilities of the SVG vector image format. This would effectively allow the eCraft software to determine the best possible set of points to re-create the arcs itself, and keep the SVG files being output as small as possible.
Holocraft, in its earliest form, before it was actually generating correct toolpaths.
After things began shaping up, I re-worked the arcpath code to create the proper hyperbolic toolpaths described in Matthew Brand's whitepaper on Specular Holography. This allowed me to then produce holograms that do not distort and warp beyond a viewing position that was directly infront of the hologram. This meant that my arcpath SVG output was no longer viable. Initially it appeared that I would have to start outputting giant SVG files with many points being plotted along each curve. After some more reading about the SVG format, it appeared that I could utilize the cubic Bezier curve functionality in the SVG format to keep the output small. Then it became a matter of calculating the starting and ending control points that manipulate the Bezier curve from a set of points that lie on eah hyperbola. This took a day or two to fully figure out and write into Holocraft.
At this point in time I am still working on Holocraft, it is unfinished. I have added a few other features. One in particular allows the user to select from a few different modes of generating the points used to construct the hologram from, instead of being limited to using a model's vertices or a selection of points on polygon edges. Using procedural texturing techniques I am generating a variety of different patterns and textures of points on the surface of the models that can be used to create a hologram. This allows for a wider variety of models to be usable to generate holograms from, instead of being limited to simple low-polygon models, now larger more complex models can be used and a surface pattern texture can be generated to simplify its appearance so as to prevent too many overlapping grooves from being generated, which only serves to corrupt their ability to reflect light.
I am also in the middle of finishing up some occlusion culling code that allows the model to obstruct itself and 'chop' the grooves into smaller and or shorter segments so that a point of light can appear to disappear behind the foreground parts of the model as the viewer's perspective changes.
As great as all of this sounds, the reflective cardstock isn't the best medium, nor is the eCraft the best machine for producing a hologram with. The cardstock can only support so many grooves before the hologram turns into a mess that no longer catches the light properly. The cardstock is also prone to warping with enough grooves, and even shredding the reflective material if the tool goes over the same spot too many times. Putting the finished holograms into a heat press has shown to be somewhat effective in flattening out some of the warping, but it's not one-hundred percent effective. Using the fabrication method I've fashioned requires some finessing with Holocraft, to try and squeeze as many grooves into the hologram as possible without them hindering one-another by overlapping too much, which is extremely easy to do.
Ideally I'd like to offer up the reflective cardstock holograms as a product in our online store. The best possible way to use them is to frame them in a way that keeps them flattened as much as possible, and hang them or set them where there is a light shining on them from above. The reality is, though, that better holograms are to be had. By fabricating holograms into metal, using a CNC machine, many more grooves can be embedded to create a more vivid and detailed hologram, with a greater specularity than the reflective cardstock can produce, making holograms brighter and sharper. This can be seen looking at images of Brand's holograms. They are simply beautiful.
That is why I will be launching a crowdfunding campaign, either to fund a simple low-end CNC setup, or fund a CNC retrofit kit for my late father's manual Bridgeport manual milling machine that's setup and ready to go, but that nobody is using for anything at all. I have a nagging sense that I owe it to him to put his old stuff to use as much as I can, in his spirit, and in celebration of his life and who he was. A part of me wishes I had discovered this project while he was still alive and well, and it could have been one of the father-son projects that will always seem too few and far in-between.